
Table of Contents
- What You'll Need to Clean Dog Crates Properly
- Step 1: Remove Bedding and Debris
- Step 2: Choose a Pet-Safe Crate Disinfectant
- Step 3: Wash the Wire Crate and Plastic Tray
- Step 4: How to Remove Dog Urine Smell from Metal Crate
- Step 5: Rinse Thoroughly and Dry Completely
- Step 6: Clean Bedding and Soft Inserts
- Deep Cleaning Schedule for Dog Kennels
- Frequently Asked Questions
Last Updated: September 7, 2026
Cleaning a dog crate protects your pet from bacteria, odors, and skin irritants. Many owners wipe visible surfaces and stop, leaving grime that causes lingering smells. Knowing how to clean durable dog crates properly means treating a wire crate as two distinct materials.
Below, we'll walk through six concrete steps, from stripping out the bedding to sanitizing the tray, using practical, residue-free methods.
What You'll Need to Clean Dog Crates Properly
Gathering supplies beforehand prevents reaching for harsh chemicals mid-task. A general household cleaner can leave toxic residue your dog will lick or sniff. Stick to pet-safe items you likely already own.
- Mild dish soap for breaking down oils and everyday dirt
- White vinegar for natural odor neutralization and sanitization
- Baking soda to tackle stubborn smells and lift dried messes
- A scrub brush with firm bristles for the plastic tray and wire mesh
- Microfiber cloths for wiping down and drying surfaces
- Rubber gloves to protect your hands from grime and hot water
- A bucket of warm water for rinsing and washing
Step 1: Remove Bedding and Debris
Take the crate apart as much as the design allows. Most wire crates have a removable plastic tray, and many fold down flat. Remove all bedding, blankets, and toys, shaking them out over a trash bin to dislodge loose hair and crumbs.
Use a handheld vacuum or damp microfiber cloth to pick up remaining debris from the tray and crate floor, especially in corners where fur and dander collect. Washing a surface with loose dirt on it pushes grime around and clogs your solution.
If your dog has had a urine accident, blot up fresh moisture with paper towels before scrubbing, pressing firmly to absorb as much liquid as possible. This makes odor removal in Step 4 far more effective.
Step 2: Choose a Pet-Safe Crate Disinfectant
For routine cleaning, use warm water and mild dish soap. For deeper cleaning that neutralizes odors, white vinegar diluted with water in a 1:1 ratio works as a natural disinfectant.
Pet-safe disinfectant options vary, so read labels carefully. Look for products safe around animals that do not contain phenols or quaternary ammonium compounds, which are toxic to cats and can irritate dogs (peer-reviewed research). Enzymatic cleaners break down urine and feces proteins, making them a strong choice for spot treatments.
For routine maintenance, you do not need a heavy-duty chemical. Overusing strong disinfectants can damage the protective coating on metal crates, leading to rust. Reserve them for deep cleaning or after your dog has been sick.
Step 3: Wash the Wire Crate and Plastic Tray
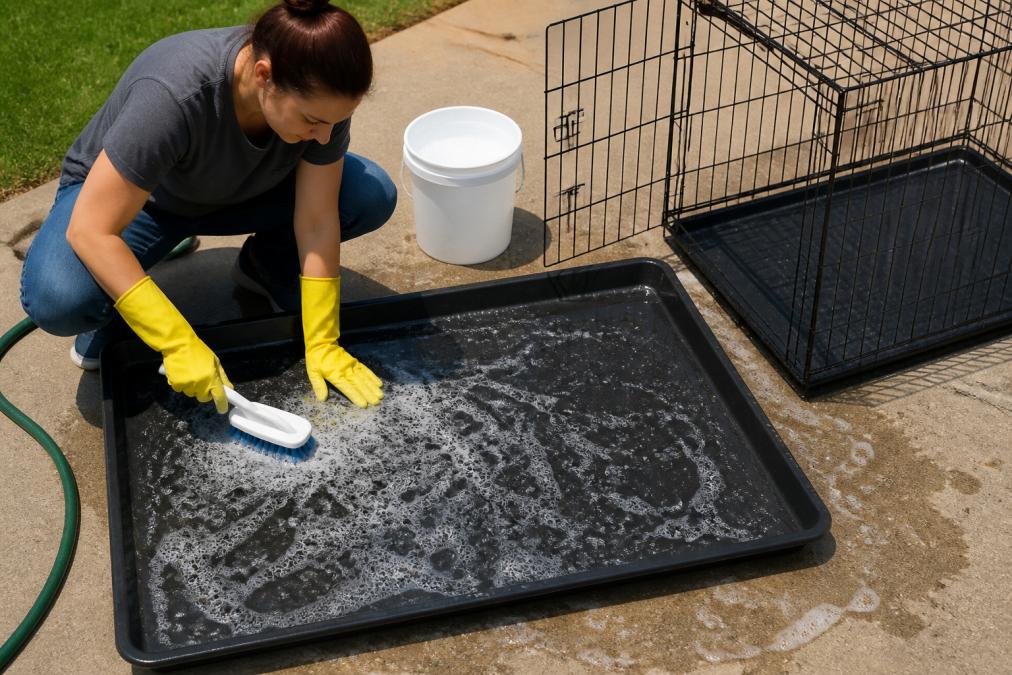
With your cleaning solution mixed, dip your scrub brush into the soapy water and start with the plastic tray, where most bacteria and odors settle. Scrub both top and bottom surfaces thoroughly, using firm, circular motions to work soap into textured gripper areas.
Move to the wire crate next. Wipe down each bar individually with a soapy microfiber cloth, paying close attention to hinges and latches where dirt and saliva accumulate. For stubborn spots like dried drool or caked-on food, let the soapy water sit a few minutes to soften the mess before scrubbing again.
Material-Specific Cleaning Protocols
The material your crate is made from determines the tools, solutions, and techniques you should use. The wrong approach can damage the finish, void the warranty, or leave behind residue that irritates your dog. Here is how to tailor cleaning to the three most common durable crate types.
Wire crates with a plastic tray. This is the most common configuration, and the two materials require different treatment. For wire panels, use a soft cloth or sponge rather than an abrasive scrub pad. The powder-coated finish can be scratched by steel wool, creating microscopic grooves where bacteria hide and rust can take hold. For the plastic tray, a firm-bristled brush is safe, but avoid metal bristles that can gouge the plastic.
Heavy-duty plastic crates (airline-style). These are typically molded from high-density polyethylene (HDPE), which is non-porous and resistant to staining. The main challenge is the textured floor and ventilation slots where debris packs in tightly. Use a stiff nylon brush and a 1:1 vinegar-water solution to work into the texture. For ventilation slots, a pipe cleaner or old toothbrush reaches into narrow gaps. Avoid hot water above 140°F on HDPE, as extreme heat can warp the plastic (machinedesign.com). Never use citrus-based cleaners; the oils can degrade the plastic's integrity and cause brittleness.
Soft-sided crates. These are typically made from polyester or nylon fabric over a collapsible metal or plastic frame. The fabric panels cannot be submerged in water, as this can damage the internal frame and cause rust. Instead, spot clean the fabric with warm water and mild dish soap, working the solution in with a soft cloth. For the frame, wipe down the poles with a damp cloth and dry thoroughly before folding. If fabric panels are removable and machine washable per the label, use a gentle cycle with cold water and air dry only. Never put soft-sided crate fabric in a dryer, as heat can shrink the material and melt zippers or Velcro.
Cleaning the Hinges, Latches, and Folding Mechanisms
The hinges and latches on a folding wire crate are the most neglected areas and the most likely to rust or seize up. After washing the main panels, dip a cotton swab or old toothbrush into soapy water and work it into the hinge joints and latch mechanisms. Wipe away excess moisture with a dry cloth. Once fully dry, apply a thin layer of food-grade mineral oil or silicone-based lubricant to the hinges to prevent rust and keep the mechanism smooth. Avoid WD-40 or other petroleum-based lubricants, as fumes and residue are not safe for your dog.
What to Do About Rust Spots
If you notice rust spots on the wire panels, address them before they spread. Light surface rust can be removed with a paste of baking soda and water applied with a soft cloth. Rub gently in the direction of the grain, then wipe clean and dry thoroughly. For more significant rust, use fine-grit sandpaper (220-grit) to carefully remove it, then touch up with rust-inhibiting enamel spray paint designed for metal. Allow the paint to cure for at least 24 hours before returning the crate to service. If rust has compromised the structural integrity of the wire, replace the crate entirely, a rusted wire can snap and create a sharp edge that injures your dog.
Step 4: How to Remove Dog Urine Smell from Metal Crate
Urine odor on a metal crate is a different challenge than on plastic because the porous coating on the wire can trap the smell. The key to learning how to remove dog urine smell from metal crate surfaces is using an enzymatic cleaner that breaks down uric acid crystals, rather than masking the scent with fragrance.
Apply the enzymatic cleaner directly to the affected bars and let it sit for the time specified on the label, usually 10 to 15 minutes. After the dwell time, scrub gently with your brush, then wipe clean with a damp cloth.
For a DIY alternative, create a paste using baking soda and a small amount of water. Spread it over the affected metal areas and let it dry completely. The baking soda absorbs odors as it dries; brush it off and wipe the surface clean. This method is gentle on the crate's coating and safe for your pet.
Troubleshooting Specific Messes
Vomit, diarrhea, and blood each require a slightly different approach because they leave behind different biological compounds. Here is how to handle the most common accidents without damaging the crate or leaving a lingering odor.
Urine on the plastic tray. The plastic tray is non-porous, so urine does not soak in, but it can leave a yellow stain and strong ammonia smell if not treated quickly. After blotting up fresh urine, spray the tray with a 1:1 vinegar-water solution and let it sit for five minutes to neutralize the ammonia. Scrub with a firm brush, rinse thoroughly, and dry. If the odor persists, apply an enzymatic cleaner and allow it to air dry completely before rinsing. For stubborn cases, soak the tray in warm water with a half-cup of baking soda for 30 minutes before scrubbing.
Vomit in the corners and crevices. Vomit is acidic and can etch the plastic tray if left to sit, and it tends to seep into seams where the tray meets the wire frame. Remove as much solid material as possible with a paper towel, then apply a paste of baking soda and water directly to the area. Let it sit for 15 minutes to neutralize the acid and lift the stain. Scrub gently with a soft brush, rinse, and dry. For dried, crusted vomit, soften it first by placing a damp microfiber cloth over the area for 10 minutes before scrubbing.
Diarrhea in the wire mesh and hinges. Diarrhea is the most difficult mess to clean because it is liquid and spreads easily into small gaps of the wire mesh and hinge mechanisms. Start by blotting up as much as possible with paper towels. Then, mix one tablespoon of mild dish soap with one cup of warm water. Use a toothbrush dipped in this solution to work into wire intersections and hinge joints where diarrhea has seeped. Rinse the toothbrush frequently and reapply until clean. Follow up with an enzymatic cleaner to break down remaining biological matter. Dry thoroughly with a hair dryer on a cool setting to ensure no moisture is trapped in the hinges.
Blood stains. Blood requires cold water, not hot, as hot water causes proteins in blood to bind to the surface. Blot the stain with a cloth dampened with cold water, then apply a small amount of hydrogen peroxide (3% solution). Let it bubble for a few minutes, then blot with a clean cloth. Rinse with cold water and dry. Test the hydrogen peroxide on an inconspicuous area first, as it can have a mild bleaching effect on some plastics.
Odor Neutralization Beyond the Surface
Sometimes the smell persists even after the visible mess is gone because the odor has permeated the crate's padding or surrounding area. After cleaning, place an open box of baking soda inside the crate and leave it for 24 hours to absorb ambient odors. For a faster solution, wipe down the interior with a cloth dampened with undiluted white vinegar, then allow the crate to air dry in a well-ventilated area. The vinegar smell dissipates within a few hours and takes other odors with it. Avoid scented air fresheners or perfumed sprays inside the crate, as these can overwhelm your dog's sensitive nose and cause respiratory irritation.
Step 5: Rinse Thoroughly and Dry Completely
Residue from any cleaning product, even mild soap, can irritate your dog's skin or attract dirt. Use a clean bucket of warm water and a fresh microfiber cloth to wipe down every surface you just washed, removing all traces of soap or cleaner.
For the plastic tray, rinse it directly under a hose or in a bathtub if weather does not permit outdoor cleaning, holding it at an angle to ensure water runs off completely. For the wire crate, a damp cloth rinse followed by a dry cloth pass works best to avoid getting water into the hinges.
Air dry is the preferred method for both components. Set the tray and crate in a well-ventilated area out of direct sunlight, which can cause plastic to fade or become brittle. Wait until every surface is completely dry before reassembling, as trapped moisture creates an environment for bacterial growth and mildew.
Step 6: Clean Bedding and Soft Inserts
While the crate structure dries, turn your attention to the soft components. Wash your dog's bedding, blankets, and any crate mats according to the care instructions on their labels. Most machine-washable items can be cleaned with a pet-safe detergent on a gentle cycle.
Add a half-cup of white vinegar to the rinse cycle. The vinegar acts as a natural fabric softener and neutralizes odors trapped in the fibers without leaving a strong vinegar smell once dry. Avoid dryer sheets or fabric softeners, as the fragrances can be overwhelming for a dog's sensitive nose.
For soft-sided carriers or padded inserts that cannot be machine washed, spot clean them with warm water and mild soap. Blot the area rather than scrubbing to avoid pushing the stain deeper into the padding. Allow these items to air dry completely before placing them back inside the crate.
Deep Cleaning Schedule for Dog Kennels
Routine maintenance and deep cleaning are not the same task, and a deep cleaning schedule for dog kennels should reflect that difference. Spot cleaning, which involves wiping down the tray and removing visible debris, should happen every two to three days or immediately after any accident.
A full disassembly and wash, following all six steps above, is recommended every two to four weeks for the average household with one dog. Households with multiple dogs, puppies still house training, or dogs that spend significant time crated while you are away should move to a weekly deep clean.
| Cleaning Level | Frequency | What It Includes |
|---|---|---|
| Spot Clean | Every 2-3 days | Remove debris, wipe tray, replace soiled bedding |
| Weekly Deep Clean | Every 7 days | Full wash of tray and wire, clean bedding, odor treatment |
| Monthly Maintenance | Every 4 weeks | Disassemble crate, inspect for rust or damage, deep disinfect |
Preventative maintenance extends beyond washing. Each time you deep clean, inspect the crate for sharp edges, rust spots on the metal, or cracks in the plastic tray. Catching these issues early prevents injuries and addresses wear before it compromises the crate's structural integrity. A well-maintained crate cleaned on a regular schedule will last for years and remain a safe, comfortable space for your dog.
Frequently Asked Questions
What is the best way to clean a metal dog crate?
The best way to clean dog crates properly involves a few key steps. Start by removing all bedding and loose debris. Wash the wire panels and plastic tray with warm water and a mild detergent or a pet-safe crate disinfectant. For stubborn spots, use a scrub brush. Always rinse thoroughly to remove any soap residue, then let all parts air dry completely before reassembling.
Can I use Clorox wipes on my dog's crate?
Avoid using Clorox wipes or any bleach-based products on your dog's crate. These can leave a toxic residue that is dangerous if your dog licks the surfaces. The fumes can also be irritating. Instead, choose a non-toxic cleaner or a pet-safe disinfectant specifically designed for kennels. A simple solution of white vinegar and water works well for routine cleaning.
How do I remove stubborn odors from a dog crate?
To remove dog urine smell from metal crate surfaces, first wash the area with warm soapy water. Then, apply a solution of equal parts white vinegar and water or a dedicated enzyme cleaner. Enzymes break down the uric acid crystals that cause odors. Let the solution sit for 10-15 minutes, scrub, and rinse thoroughly. Baking soda can also help absorb lingering smells.
How often should I deep clean my dog's crate?
A deep cleaning schedule for dog kennels depends on your dog's habits. Spot clean accidents and remove hair daily. Perform a thorough deep clean of the entire crate, including the tray, wires, and bedding, at least once a week. If your dog has allergies or is prone to accidents, you may need to increase the frequency to every few days.