
Table of Contents
- Why Cleaning Pet Grooming Brushes Matters More Than You Think
- What You'll Need to Clean Pet Grooming Brushes
- Step 1: Remove Hair and Debris From Your Slicker Brush
- Step 2: Soak and Scrub Different Brush Types
- Step 3: How to Sanitize Dog Grooming Tools Properly
- Step 4: Dry Brushes Correctly to Prevent Rust
- How Often to Replace Dog Grooming Brushes
- Common Mistakes That Ruin Grooming Tools
- Frequently Asked Questions
Last Updated: September 4, 2026
Why Cleaning Pet Grooming Brushes Matters More Than You Think
A grooming brush caked with fur, dander, and natural oils isn't just ineffective; it becomes a breeding ground for bacteria that can transfer back onto your pet's skin (the CDC). Dirty pet grooming brushes fail to penetrate the coat, which leads to matting and missed loose hair, undoing the work you are trying to accomplish. Learning how to clean pet grooming brushes correctly extends their lifespan, protects your pet from skin irritation, and makes each session more comfortable. Skipping this routine means you are essentially rubbing yesterday's debris back into a fresh coat. Below, we'll show you exactly how to restore your tools to like-new condition with a simple four-step process that takes under ten minutes.

What You'll Need to Clean Pet Grooming Brushes
Before you start, gather a few household items to make the job quick and efficient. You need a wide-tooth comb or your fingers for debris removal, a bowl of warm soapy water, mild shampoo or dish soap, and a soft-bristled toothbrush for scrubbing between the bristles.
For sanitization, keep white vinegar or rubbing alcohol on hand, plus a clean towel for drying. A force dryer or hairdryer on a cool setting speeds up the process, but air drying works fine if you are patient. These supplies cover every step of the cleaning process, from debris removal to rust prevention.
Step 1: Remove Hair and Debris From Your Slicker Brush
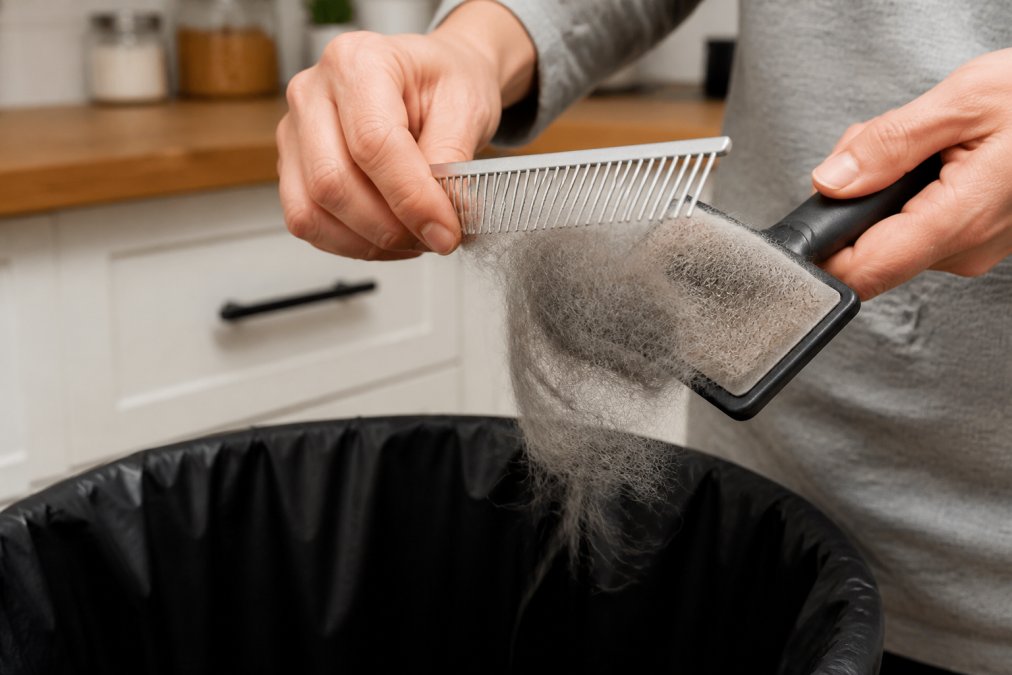
Start by pulling out the loose hair trapped in the bristles before the brush ever touches water. Use a wide-tooth comb to lift hair from the base of the slicker brush, working in sections until the pins are mostly clear. Flick the collected fur directly into a trash bin to prevent hair accumulation from clogging your drain later.
For stubborn hair wrapped tightly around the pins, use your fingers to tease it loose gently. Avoid yanking, which can bend the pins and ruin the brush's alignment. This initial dry step removes the bulk of the debris, making the subsequent soak far more effective.
Step 2: Soak and Scrub Different Brush Types
Once the bulk of the hair is gone, submerge the brush in warm soapy water for about ten minutes. The soak loosens the natural oils, dander, and any residual dirt clinging to the bristles and the base of the brush.
After soaking, use a soft toothbrush to scrub gently between the pins. Pay close attention to the base where debris accumulates and hardens. For slicker brushes and pin brushes, scrub in the direction of the pins to avoid bending them. Rinse thoroughly under running water to wash away the loosened grime and soap residue.
Cleaning Wooden and Rubber-Handled Brushes
Wooden handles require special attention because prolonged soaking in water can crack the wood or strip the finish. Instead of submerging the entire brush, dip only the bristles into the soapy water, keeping the handle dry. Wipe the wooden handle with a damp cloth and dry it immediately to prevent swelling.
Rubber-handled brushes are more forgiving, but the rubber can degrade if exposed to harsh chemicals or boiling water. Stick with warm soapy water and mild shampoo to preserve the grip and flexibility of the rubber.
Step 3: How to Sanitize Dog Grooming Tools Properly
Sanitization goes beyond simple cleaning; it kills the bacteria that cleaning alone leaves behind. The critical distinction is that cleaning removes visible dirt and debris, while sanitizing reduces the number of pathogens to a safe level. For a grooming brush that touches your pet's skin, you need both.
After scrubbing and rinsing, you have several effective options. The most common is a solution of one part white vinegar to three parts water. Submerge the brush for five minutes, then rinse thoroughly. Vinegar is a mild acid that disrupts bacterial cell membranes, but it is not effective against all fungi, so it is not a complete solution for households with known skin issues.
For a more robust sanitization, use 70% isopropyl rubbing alcohol (the CDC). This concentration is more effective than higher percentages because the water content helps denature proteins in bacterial cells. Pour the alcohol into a shallow dish and dip the bristles for two minutes, ensuring the metal pins are fully coated. Allow the brush to air dry completely; the alcohol will evaporate, leaving no residue. This method is safe for metal pins and plastic handles, but avoid prolonged contact with painted or lacquered wooden handles, as alcohol can strip the finish.
A third option is a commercial pet-safe disinfectant specifically formulated for grooming tools. Look for products with active ingredients like quaternary ammonium compounds, which are effective against a broad spectrum of bacteria and viruses while being safe for use around pets when diluted correctly. Always follow the manufacturer's dilution instructions precisely; using too strong a solution can damage the brush, while too weak a solution will not sanitize effectively.
This step is essential for preventing cross-contamination between pets, especially in multi-pet households where fungal or bacterial infections can spread through shared grooming tools. A proper sanitization routine is a key part of how to sanitize dog grooming tools effectively, ensuring your equipment is hygienic for every use.
Step 4: Dry Brushes Correctly to Prevent Rust
Moisture is the enemy of metal pins, and rust prevention starts the moment you finish rinsing. Shake off excess water, then lay the brush on a clean towel with the bristles facing down to allow water to drain away from the handle.
For faster drying, use a force dryer or a hairdryer on a cool setting to blow water out from the base of the bristles. Never store a damp brush in a drawer or cabinet, as trapped moisture accelerates rust and creates a breeding ground for mold. Allow the brush to air dry completely for a few hours before its next use.
| Cleaning Step | Purpose | Frequency | Key Mistake to Avoid |
|---|---|---|---|
| Debris removal | Prevents matting and clogged drains | After every use | Bending pins while pulling hair |
| Soak and scrub | Loosens oils and trapped dirt | Weekly | Soaking wooden handles |
| Sanitization | Kills bacteria and fungi | Weekly or between pets | Using bleach or boiling water |
| Drying | Prevents rust and mold | After every wash | Storing brushes while damp |
How Often to Replace Dog Grooming Brushes
Even with meticulous care, pet grooming brushes wear out and need replacing. The frequency depends on how often you groom and the thickness of your pet's coat, but a good rule of thumb is to inspect your brushes every six months for signs of wear.
Common indicators that it's time to replace your brushes include bent or broken pins that snag the coat, loose bristles that fall out during use, and cracked handles that harbor bacteria. Rust on the pins is another clear sign, as it can irritate your pet's skin and compromise the tool's integrity. If you are unsure how often to replace dog grooming brushes, trust these visual cues over a strict calendar schedule.
Common Mistakes That Ruin Grooming Tools
The fastest way to destroy a quality brush is to leave hair wrapped around the pins and soak the entire tool in water. Hair left in the bristles pushes the pins out of alignment, while soaking wooden handles causes the wood to swell and crack.
Another frequent error is using a disinfectant that is too harsh for the brush materials. Many pet owners reach for bleach, not realizing it corrodes the metal pins and breaks down the adhesive holding them in place. Always read the manufacturer's instructions and stick to pet-safe cleaning solutions like mild shampoo or white vinegar.
Troubleshooting Rust and Oxidation on Metal Pins
If you notice orange-brown spots or a rough texture on the pins, rust has already begun to form. This is not necessarily the end of your brush's life, but it requires immediate action. The rust is iron oxide, which forms when moisture reacts with the metal over time. Left unchecked, it will flake off and can irritate your pet's skin or become embedded in their coat.
For light surface rust, create a paste using baking soda and water. Apply the paste to the affected pins with a soft toothbrush and gently scrub in a circular motion. The mild abrasiveness of the baking soda lifts the rust without scratching the metal. Wipe the pins clean with a damp cloth, then dry them thoroughly with a hairdryer on a cool setting.
For more stubborn rust spots, use a fine-grit abrasive pad (like a 0000-grade steel wool) to gently buff the affected areas. Work slowly and carefully to avoid bending the pins. After buffing, wipe the pins with a cloth dipped in white vinegar to neutralize any remaining oxidation, then dry completely.
If the rust has deeply pitted the metal or the pins have become brittle and break easily, replacement is the only safe option. A brush with compromised pins can snag your pet's coat and cause unnecessary discomfort. Inspect your brushes monthly for early signs of oxidation, especially if you live in a humid climate where moisture in the air accelerates the rusting process.
Frequently Asked Questions
How often should you clean your dog's grooming brush?
Remove hair and debris after every grooming session. A deep clean with soap and sanitizing solution should happen every two to four weeks, depending on how often you groom your pet. If you have multiple pets, sanitize tools between each animal to prevent cross-contamination. For pets with skin conditions, clean brushes after every use to avoid spreading bacteria or fungal spores back onto the coat.
What is the best way to disinfect pet grooming tools?
After removing hair and washing with mild shampoo, soak brushes in a solution of warm water and pet-safe disinfectant or diluted chlorhexidine. Rubbing alcohol works for metal and plastic parts, but avoid soaking wooden handles. Let tools air dry completely before storing. This routine keeps your pet grooming brushes hygienic and prevents bacterial growth without damaging bristles.
Can you wash plastic pet brushes in the dishwasher?
It is not recommended. The high heat and harsh detergents can warp plastic bases, melt glue holding bristles in place, and damage rubber cushions. Hand washing with warm soapy water is safer and gives you control over the process. If you do use a dishwasher, place the brush on the top rack without heat dry, but expect a shorter lifespan for the tool.
How do you remove matted hair from a slicker brush?
Start by using a wide-tooth comb or your fingers to lift clumps of hair from the bristles, working from the base outward. For stubborn mats, soak the brush head in warm soapy water for 10 minutes to loosen the hair. Never pull hair outward from the tip, as this bends the pins. A specialized brush cleaner with plastic teeth can also lift debris without damaging the bristle coating.
This article was written using GrandRanker